Video: 2 minute intro; Tutorial: Worked examples; Help: Contents

Dec 10, 2009

Extreme Graphic Design makeover

In the run-up towards commercial launch, we're giving bCisive Online an extreme makeover.  Here's a taster:

Before (Current Spaces page):


After (early mock-up of the new "Home" page):


Click to enlarge

We certainly enjoy bringing in David Urbinder to help with this aspect of our products.  Inevitably there's a nice interplay between graphic and interaction design.

We hope you like the way we're heading.

Nov 25, 2009

Is it possible to self-host bCisive Online?

At present bCisive Online requires connection to the internet.

We are aware that some organizations may prefer or require an intranet / WAN hosting option for reasons of security, etc., and we expect to offer such an option, for sizable installations (probably 25 users+).

Please contact us if you are interested in exploring a self-hosted bCisive Online solution.

Nov 17, 2009

Controlling access to Spaces, plus renaming and deleting

To control who has access to a space that you own, or rename it, or delete it, click Manage from the Spaces area of the home page:


Only the spaces that you own will have a Manage link.

Details
In an organizational setting, not everyone should have access to every Space. To this end we have introduced a new set of roles to bCisive Online. In any given space you will be exactly one of the following, in increasing order of power:
  1. Denied: The Space will not appear on your Spaces page, and you cannot access it
  2. Viewer (coming soon): You can view the space, but cannot edit it
  3. Member: You can edit the space, request control, and pass on control
  4. Moderator (coming soon): Like a member, plus you can grab control, and you can invite guests (non-site-members) temporarily into the space
  5. Owner: Like a moderator, plus you can set the level of access of other site members
When you create a space you will automatically be appointed its Owner.

From a space's "Manage" page


you can:
  • restrict and limit access of site-members to the space, 
  • control guest access to the space
  • rename* the space, and 
  • delete the space (not shown)
  • set a default level of access for new users (members) of the site

Notes and tips:
  • Appointing someone else a co-owner of the space facilitates hand-off.
  • Owners can demote other owners
  • Making everyone except the owner of the space a Viewer effectively freezes the space.
  • Renaming the space does not kill hyperlinks to the space, but deleting it does

Ideas for better snapshots

With bCisive Online you can save snapshots of a Space (and get them back). This facility could be even better:
  1. The date-stamp on each saved version should show local time, not server time
  2. The user should be prompted to add a short comment when (s)he saves
  3. Space owners and moderators should be allowed to delete a snapshot
  4. It would be handy to be able to preview a snapshot before loading it
Presently anyone who can edit a space can save and restore snapshots. An alternative arrangement would restrict saving and uploading to space owners and moderators. A logical consequence of this would be that space members would only be allowed to edit a space in the presence of an owner (or moderator), since otherwise a member could use auto-save to obtain unsupervised save rights.

Any backing for this refinement?

Save snapshots of the workspace

Although bCisive Online has periodic auto-save there are times when you want to go back to an earlier version of the workspace. Saving allows you to do just that:
  • Before exiting a Space while in control, to keep any changes
  • In case you lose work by accident, error, or technology failure
  • To replay the history of a discussion

When you click the "Save" button the current state of the workspace is saved and stamped with current date-time (for now the time at the central server).


To go back to an earlier saved version of the workspace, click on the "History" tab and click on the "Revert To" button to call up the old version.  Tip: Consider Saving the current version first!

Wishlist functionality:
  • Text comments when saving, for a more informative history
  • Graphic preview before reverting 

Nov 10, 2009

Presenting a map in bite-sized chunks

bCisive Online (and bCisive desktop) are great tools for capturing team planning and problem-solving sessions. They encourage buy-in and help participants to work together both thoroughly and constructively.

But a great session does not automatically make for a great presentation to others. bCisive contains a powerful tool -- PowerPoint export -- to help construct visually compelling presentations, but to get the most out of it, you need to know how to break a big map into a well-organized story.

The problem: You had to be there!
The result of a good session typically yields a big map, and if this is presented as it stands to someone who wasn't part of the original session, rather than getting buy-in more typical responses are incomprehension or distancing.

The solution: Tell a story
The basic idea is to break down the map, which in its original form shows everything all at once, into a linear narrative: a story.

Using the output-to-PowerPoint feature, you can export your map straight to PowerPoint where you can add logos and text for a great visual summary. To create your story, break your map into bite-size chunks, and organize them in a way that will make it easy for your audience to follow. Here's how we do it:
  1. Start with an overview
  2. Drill down into the good bits (discard the bits you don't need)
  3. Show the links


An example of a big map (click for full size)


Breaking a map into several slides

First, we create an overview slide by hiding the branches below the top couple of levels, and taking a slide.


Next, we show the branches again and take slides of each one separately. Export to PowerPoint for (in this case) a four-slide presentation:


Now, we simply add joiners in PowerPoint to indicate how the parts of the map connect.


The result is a clear and easy-to-follow presentation of the separate parts of the argument, resolution or proposal.

Expert tips:
  • For deep maps, the drill-down may need to be broken across multiple slides, repeating the same trick
  • In bCisive desktop you can add headers and footers from within bCisive, and also choose to export some slides in a dot point format; these features can be expected to arrive in due course in bCisive Online
  • A conclusion slide at the end can remind the audience of the original overview, ideally with a little visual variation
Going further
We've found that this process works very well for us, but it may not be suitable for some styles of presentation. We'd love to hear about other ways that also work well, especially with an instructive example. Please let us know!

We think it would be great if a map sliced up into slides and exported from bCisive Online had any necessary joiners added automatically. Something to look forward to.

Nov 5, 2009

Keyboard shortcuts


Undo and redo

* Apple users: Use "Command" instead of "Ctrl" for these shortcuts.

Delete a box or a branch
Add a new box to a map
  • Add sibling (Enter or Shift+Right Arrow): Add a new box of the same type to the right of the selected box
  • Add child (Insert or Shift+Down Arrow): Add a new plain box below the selected box
Text editing

From maps to text

Sometimes you just want the text, and nothing but the text. You've planned a report visually in bCisive Online, but now it's time to write the report in your word-processor of choice.

For example, automatically turn this

Overview of the proposed text output feature

into something like this:
Proposed feature: Text output

1. What is it for?
1.1. Example: Writing reports
1.2. Example: Writing executive summaries
1.3. Example: Extracting lists of tasks

2. What is a good starting feature set?
This what-you-see-is-what-you-get approach allows the user (or team!) to fully explore ideas by creating a really large map, but when producing the text output to be selective, and break the worthwhile parts of the map into smaller, more digestible chunks. In this example I have hidden the details of the starting feature set, which we can now reveal:

Suggestions for the initial feature set

and generate the text for these too:
2. What is a good starting feature set?
2.1. Idea: Similar to the PowerPoint output feature: Take "snapshots" of branches
2.2. Idea: Respect hide-show, so that What-You-See-Is-What-You-Get
2.2.1. Example: Only show the top two or three levels to get the draft for an exec. summary.
2.3. Idea: Filter option to get a flat list of all the boxes of a particular type
2.3.1. Example: Extract all the Tasks (probably a good default) into a list
2.4. Idea: Settings to allow or disallow automatic numbering, indentation, color, etc. (similar to bCisive desktop)
From there the idea would be to polish up the text in your word-processor (or email software, etc.) and either maintain outline form; edit it into a traditional text of headings, paragraphs, and sentences; or, perhaps most likely, create a mix of both.

Oct 22, 2009

Early beta feedback

Being able to interact live is terrific. I have found it saves me trips to our other office. -- Beta user working in IT & communications
Over the last five weeks, around 90 people have got involved in our beta trial of bCisive Online. Valuable comments have been rolling in; here is some of the feedback we've been getting.

Some users struggled with setting up sites and getting started building maps; we're working on a series of tutorial videos to help with this, and of course you can browse our straightforward how-to tips on this blog too.

Some areas of value identified by our beta users:
  • Making and documenting complex decisions
  • Live, remote interaction with colleagues
  • 1:1 and 1:few followups after group planning sessions
I see some potential to encourage its wider use in a digital democracy. -- Beta user working in civic government
Some requested features:
  • Single login that works across multiple sites -- already implemented; read more
  • The workspace should stretch vertically as the browser window is enlarged -- already implemented; read more
  • Keyboard shortcut to exit the text edit box -- already implemented; use Ctrl+S
  • Email notification of site details once you've set one up
  • Clearer Delete function [currently Delete is via a keyboard shortcut only; we plan to add a Delete button soon]
  • A 'Print' function
  • More icons; specific new icons e.g. Reason, Evidence, Claim; co-premise capability
  • More export options, e.g. PDF, image
  • Ability to moderate others' additions before they appear on a map
  • View-only invitations
Some concerns that we'll be addressing:
  • Security of data and uploaded documents
  • The mechanism for passing control between participants could be made clearer
  • Trying to log into a site with the same account on two separate computers at once causes strange behaviour
If you have further feedback for us, please email us or take our short beta feedback survey. If you'd like to be involved in the next stage, our pilot program for small teams, read more here.

Be part of our pilot program

Thanks to everyone who has been involved in our early beta trial for bCisive Online. For the next stage, we are looking for small teams from diverse organizations to partner with us in a more targeted pilot program.

We're aiming to work closely with our pilot teams to put bCisive Online through its paces in a real-life setting, and particularly to test out its collaborative and group features.

If your team is chosen for a pilot, we'll:
  • hold your hand to get bCisive Online set up and working with your team
  • give you and your team close support throughout the pilot in return for your valuable feedback
  • offer you discounted licensing or additional free licenses for the first year, once bCisive Online goes commercial
Interested? Great! Please send us an email and tell us:
  • Who are you?
  • The name of your organization
  • The role of your team
  • The size of your team
  • What are you hoping to use bCisive Online for?
  • What other product or process are you hoping bCisive Online will replace?
If you're interested in the pilot program but feel that bCisive Online as it currently stands isn't ready, please let us know what specific changes you would have to see before you got involved.

Oct 20, 2009

Inserting a box above multiple child boxes

The most obvious way to build a map is by progressively adding new boxes below and next to existing ones (new children and siblings). However, you can also insert boxes into the middle of your map - new parent boxes. There are two ways to do this:
To insert a new box above multiple children, drag the new box until a red horizontal indicator line appears underneath the children's existing parent box.


Release the mouse button and the new box is inserted as a new parent to all child boxes.

Inserting a box above an individual child box

The most obvious way to build a map is by progressively adding new boxes below and next to existing ones (new children and siblings). However, you can also insert boxes into the middle of your map - new parent boxes. There are two ways to do this:
To insert a box above an individual child box, drag the new box until you see a horizontal red indicator line above the appropriate child box.


When you release the mouse button, your new box will be inserted into the map as the new parent box for that single child box.

Detaching and attaching a box or branch

To detach a box or an entire branch from your map, click on the box (or the parent box, for a branch), hold and drag it away to a clear part of your workspace. When you release, the box or branch will drop onto the workspace, detached from your map.


You can use this detach function to turn part of your map into two separate maps, or as an intermediate step while restructuring a map; detached boxes and branches can be reattached later.

To attach a box or a branch to your map, just reverse the detaching process. Click and hold the box (or the parent box, for a branch) you want to attach, drag it to where it should go, look for the red indicator line, and release:


Remember:
  • Each bCisive Online workspace is infinitely big and can contain as many separate maps as you like.

Reordering sibling boxes

Siblings are boxes that share the same parent box. Swapping them around is a simple matter of drag-and-drop.

Take this example:


To relocate the Challenge after the Pro and Con, just click on it, hold and drag it until you see the red vertical indicator line to the right of the Con box, and then release:

If the box you're moving has child boxes, the entire branch will be moved together, as in this example:

Oct 7, 2009

Compelling presentations: Outline input

In my two previous posts I showed why diagrams make for far better slides than bullet points and suggested adding outline input to supercharge bCisive Online to enable quick and eassy preparation of visually compelling, better thought-out PowerPoint presentations.

How would outline input work in practice?


Simple text input a la markdown:

With a little magic this would converted automatically to:


and then the user could quickly change the box-types by dragging out the appropriate icons from the left panel and dropping them on the boxes.

Even quicker, might be to allow some short-hand on the bullets:

    * = plain Box
    ? = Question
    + = Pro
    - = Con
    ! = Idea
    etc.
    That way a draft along the lines of

    would convert straight to:

    which is much closer to the final form, with just a Fix and two E.g.s to be dropped onto the lower three boxes.

    As an alternative to raw input, where the user is required to control indentation, another option would be to supply a more polished Outliner interface, similar to LooseStitch, but with inline editing.

    The best of both worlds may well be plain text editing with helpful buttons for indenting, un-indenting, box-types, etc. together with map preview.

    Conclusion
    Outline text input would enhance bCisive Online's useability in developing compelling presentations by making it quicker and easier to get an initial map up for editing.

    Various forms of text output -- text outline, executive summary -- would be a nice matching enhancement, allowing the user to concentrate on getting the content right, and then quickly mix and match different forms of output to get the most compelling and understandable result.

    Compelling presentations, faster

    The Problem
    Business people (and others) are increasingly familiar with the phenomenon of Death by Powerpoint:
    "Death by PowerPoint" is a criticism of slide-based presentations refering to a state of boredom and fatigue induced by information overload during presentations such as those created by the Microsoft application. -- Wikipedia
    Much of this can be attributed to two factors:
    1. Poorly thought-out presentations
    2. Over-use of "bullet points"
    A solution
    bCisive Online can help address both points by providing the workspace to help clarify and better structure the content of your presentation, and the "Export to PowerPoint" feature to convey structured information in a more visual and compelling way. The overall process currently looks like this:
    1. Enter your ideas into bCisive Online
    2. Rearrange and play with the map, maybe in collaboration with colleagues
    3. Output maps into PowerPoint form, typically giving a high-level overview, and then drilling into depth where appropriate
    4. Supplement, where appropriate, with bulleted lists, text, charts and other material to create a compelling Presentation
    You can do steps 1-3 in bCisive Online already, and step 4 in PowerPoint.

    How could this process be improved?
    • Outline input: Although I decried the over-use of outlines for presentation, they are an extremely fast and familiar way to "dump your brain". Certainly quicker than using a click-and-drag mouse-based interface. [On the other hand, click-and-drag is fantastic for editing and restructuring.]
    • Additional text-based output forms: Principally bullet points, and text forms, including executive summaries, to be used sparingly and tastefully!
    Various text-based output forms are available in bCisive desktop (text outline, decision summary). They will be added in some form to bCisive Online in due course. Outline input, on the other hand, is new for us, and will be discussed in my next post. Together these features would lead to an even better process:
    1. Enter your ideas, quickly, in outline form
    2. Automatically transform the outline into a bCisive Online map
    3. Rearrange and play with the map (or maps), maybe in collaboration with colleagues
    4. Output to Powerpoint as a mix of diagrams, bullet points, and text
    5. Refine and supplement in PowerPoint.
    Importantly, the first and last steps will be familiar to existing PowerPoint users, and the intermediate steps will deliver better structured and more visually compelling slides amazingly quickly. By keeping all hierarchical data in bCisive Online, you can structure the key content of your presentation in one place, and makes the choice of how best to present -- diagram, text, or bullet point -- a secondary consideration. Try them all; use what works best!

    Compelling presentations

    Unsure about the value of diagrams to presentations?

    Compare
    this kind of bulleted outline form:
    • What are the Pros and Cons of Outline form?
      • Pro: Good for input: Fast and familiar
      • Pro: Handy for output, sometimes
      • Con: Boring: The reader / audience's eyes glaze over
        • Fix: Mix bullet point output with other more visually interesting and informative styles of presentation.
          • E.g.: Images
          • E.g. bCisive Online diagrams
      • Con: Not great for showing relationships
    with the corresponding bCisive Online map (click on the diagram to enlarge):


    Far more compelling, eh?

    In my next post I make the case for using outline form for quickly jotting down ideas, and diagrammatic form for structuring and especially presenting. And in the final post in this mini-series I show how outline input might work in practice.

    Oct 5, 2009

    Bigger workspace size

    Until now the workspace width expanded with the browser width, but not the height, which was fixed. We've removed this limitation to allow really big workspace sizes:

    A bCisive Online workspace on a big screen: Click for full resolution

    Above a minimum size, the workspace will stretch and squeeze with your browser. So if you have a large screen, you can now make use of all that real-estate.

    Note: Depending on your web browser, you may need to clear your cache and reload a Space page for this upgrade to take effect.

    Sep 29, 2009

    Deleting a box or a branch

    It takes only a keystroke to delete a box or a branch from your bCisive Online map. Just select a box with a mouse-click, then click the Delete button, or press the Delete key:


    After:


    If your selected box has anything below it - children, grand-children, etc. - these boxes will also be deleted. But don't panic! If you delete something in error, you can easily undo your action.

    Pro tip: To delete a box without deleting, try excising instead.

    Sep 27, 2009

    Moving around the workspace: panning, zooming

    A bCisive Online workspace is infinitely big, and you can build multiple maps within it. Once your map or maps get large, you won't often want to see all of the space you've used at once; here's how you can move around your bCisive Online workspace and focus on different parts.

    Panning


    You can pan around by clicking on any empty bit of the workspace and dragging it. This effectively displays a new part of the workspace in your viewing window.

    Zooming

    To zoom, use the slider or the - and + buttons at the top of the workspace:


    Fit All / Fit Map

    These handy shortcut buttons, next to the Zoom slider, allow you to zoom automatically to show the entire selected map, or the whole workspace. You can then identify and zoom in on the area you want to work on.

    Interesting to note: Unlike in the desktop version of bCisive, in bCisive Online you can't zoom in and out on your map using the scroll button on your mouse. Instead, the scroll button does what you'd expect in a browser: scrolls the browser window.

    Hide and show

    bCisive Online includes a Hide and Show feature that enables you to work more easily with larger maps, draw attention to a particular part of your map or customize your export to PowerPoint.

    To hide everything below a box, hold your mouse pointer over the box; click on the 'minimize' sign (-) that appears.


    A box that has hidden children appears 'stacked'. To show the hidden boxes again, hold your mouse pointer over it and click on the 'maximize' (+) button that appears.

    Undoing and redoing actions

    Made a mistake? Changed your mind? No problem.


    In bCisive Online, you can undo as many actions as you like; just keep clicking on the Undo button.

    You can also redo.

    Keyboard shortcuts:

    • Undo: Ctrl+Z (Windows) / Command+Z (Mac) 
    • Redo: Ctrl+Y (Windows) / Command+Y (Mac)

    Changing a box's type

    Did you add a Pro to your map, when it should have been a Con? Or perhaps you want to change your Ideas to Options?

    Easy: To change a box's type, drag a box from the tool panel into the workspace and over the box you want to change. A small red square will appear in the middle of the target box; release the mouse button and the box's type will change, but everything else – size, text, hyperlinks – will be kept.

    And remember, you can always undo.

    Connecting more boxes to your map

    Connecting more boxes to your first one to build a map is easy. Drag a new box from the tool panel onto the workspace, and hold it near to the box you'd like to attach it to. You'll see a red line showing where the new box will attach - underneath, beside or above another.


    When you're happy, release the mouse button and drop the new box, and connections will automatically be drawn. If it's in the wrong spot, don't worry - just grab it again and drag it to the right place.

    Things to note:
    • Maps can only be built in a top-down tree structure (for now).
    • The second box in a map can only be placed underneath the first box; after that, new boxes can be placed next to an existing one (a sibling), underneath it (a child), or on top of it (a new parent).
    • Boxes can have an unlimited number of child boxes, but each box can have only one parent.

    Adding and editing text in a box

    bCisive Online includes a text editor to let you add text to a box on your workspace, or to edit text already there.

    Double-click on the box to open the text editor:


    Type or edit your text, and edit the font, font size, color and formatting using the options below the text field.

    Tip: You can also edit the heading text in the top line of the pop-up box.  [In the above example this is the box that says "Question: Bottom line".]

    Press Shift+Enter or click Save and your text will appear in the box on your workspace:

    Adding a box to the workspace

    The workspace within your bCisive Online Space provides a place for you to map your ideas, discussion or strategic thinking. Maps - structured diagrams - are built using the collection of icons in the tool panel on the left of the screen.

    To add a box to your workspace, choose a box, drag it out onto the workspace and drop it where you want it.

    Sep 24, 2009

    Accessing a site

    Once you've created a new site or joined an existing one, how do you access it next time?

    The simplest approach is to go to the bCisive Online homepage and log in from the top right corner.


    Alternatively, you can go straight to the particular site's url -- e..g "freesite99.bcisiveonline.com" -- and log in there:

      Sep 23, 2009

      Wresting control... from myself

      Recently, Donald ran into a problem to do with the luxury item 'Leave me signed in':
      I signed into the [bCisive Online beta] sandbox at home with this feature implemented. Now I'm at work, and logging into the sandbox shows two people, me and me.

      If I request control from me ....I am not 'there' (at my home computer) to say yes or no.
      Good point, Donald!

      Our thoughts:
      1. I should be able to take control from me, no questions asked! (i.e. if both occupants are associated with the same user account.)
      2. Time-out for inactivity: automatically pass control to a requestor.
      3. Grab control option (by force!)

      Single login is here

      Until today, you were required to create a new login account for each bCisive Online site you created or were invited to access. Confusing, and cumbersome, I'm sure you'll agree.

      We've now replaced this with a single login system: once you've set up an account for your email address, you can use it to access any number of sites. (At this stage you still need to log into each site separately, but you'll now use the same password.)

      Existing users:
      • If you only had the one account, you will now be able to use it to log into other bCisive sites in the future.
      • If you previously had more than one account, we have kept the password for the first account you created and removed the rest. (If you need a password reminder, just let us know.)
      As yet, there's no 'My account' management screen where you can see a list of the sites you have access to through your single account, but that's on the wishlist.

      Entering and leaving a Space

      Enter an existing Space


      From the site's home page, click on its title in the list in the Spaces area, or click on the space's thumbnail image in the Latest Activity area:


      You'll be taken to the Space, where you will see:
      • the name of the owner(s) of the space;
      • a list of any other Occupants currently in the Space; and
      • the mapping workspace and any map(s) already built.
      To leave a Space

      In the header area near the top of the page, click on the site Site's name and you'll be taken back to the site's Home page.  E.g. In Dan's Space on "http://freesite99.bcisiveonline.com/1872/dans-space" you would click on "Free Site #99" to leave the space:

        bCisive Online > Free Site #99 > Dan's Space


      Tip: If you're in control of the space, you will usually want to Save before you leave.  Otherwise you will be prompted.

      Creating a new Space

      Within each bCisive Online site, there can be any number of Spaces, each containing an embedded bCisive workspace where you can create and edit bCisive Online "maps". The site owner or anyone invited to access the site can create a new Space.

      To create a Space, from the home page of your site,  type a name for your new Space, and click the Create button:

      Your Space will be added to the list, and then you just have to click on its title to enter it and start mapping.

      Notes:
      • Free sites are limited to a maximum of three spaces.
      • At the moment, reordering and categorizing the Spaces list (into folders, for example) isn't possible: spaces are ordered alphabetically, and recently accessed spaces appear in the "latest activity" area at the top of the home page.

      How to use bCisive Online: contents

      Welcome to the bCisive Online blog!

      Browse our how-to tips for information on how to get started and make the most of bCisive Online.


      Would you like help on how to do something in bCisive Online? Ask us in the comments, or contact us.

      Sep 22, 2009

      Inviting people into your site

      It's easy to invite others into your site, if you are a site owner or admin.

      You will see the "Invite new users" at the top of the People pane on your site's Home Page:


      Clicking on it reveals an invitation form:


      An email with sign-up instructions will be dispatched to your invitees, together with your message.

      Creating a new bCisive Online site

      A bCisive Online site is a private area that you create for your organization or yourself.

      Free site
      To create a free site, go to http://www.bcisiveonline.com and Sign up:


      You will be assigned a site with an address of the form "http://freesite99.bcisiveonline.com", and you will be logged straight in.

      You are now the owner of the site, and sole member.  Perhaps it's time to invite other people to join your site?

      Later, you can log back in to your site from directly at http://freesite99.bcisiveonline.com (or whatever), or from the bCisive Online homepage.

      Paid sites (coming soon)

      From late February 2010, you will be able to upgrade to a paid site, which besides offering a better service, will allow you to choose a more suitable name for your bCisive Online site, like "http://abccorp.bcisiveonline.com".

      Accepting an invitation to a bCisive Online site

      When someone invites you to their bCisive Online site, you will receive an email. To accept, open the email and click on the link to the sign-up page and follow the instructions.

      Accounts, accounts everywhere

      "...but I thought I already had a bCisive Online login. Why, when I head over to my friend's bCisive Online site, am I being asked to set up a new account?"

      Bear with us! We're the first to admit that the login system still needs work. Here's how it works at the moment:

      bCisive Online site
      This is the private area that you create for yourself or your organization, or are invited to join. Each site is accessed via a different subdomain, e.g. http://abccorp.bcisiveonline.com.

      Spaces
      Within each site, there can be any number of Spaces, each containing an embedded bCisive workspace where you can create a map. The site owner or anyone invited to access the site can create a Space. Click on the Spaces tab for a list of the Spaces in the site.
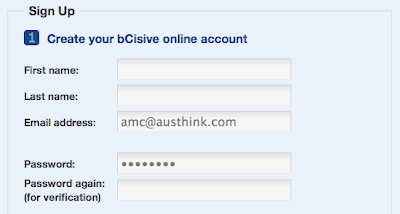
      Login accounts
      An account is your personal login information, and consists of the name, email address and password you enter when you create a site or accept an invitation to somebody else's.


      Here's the rub. Currently, there isn't a global/single sign-on facility, although it is coming in the near future. At the moment, you need to create a new account for each bCisive Online site you wish to access.

      -- Update: we've now implemented a single login. Read more here.

      Accessing other people's sites
      The only way to access a colleague or friend's site is to click the link in the invitation email they send you.


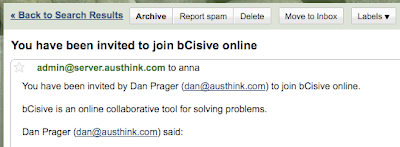
      If you do this, you will be prompted to set up an account for that site, and then you'll be taken straight into the site.

      Just going to the site's URL and trying to login using an account you've previously set up won't work, because that's the account for a different site.

      "Wouldn't it be easier just to have one global login account to access all of my bCisive Online sites?"

      Yup. We agree. We're working on it! -- Update: it's done. Read more here.